Monday, April 30, 2012

Spicy Turkey Meatballs

I love spicy food - not the spicy food like my mouth goes numb, but I like some heat on occasion. These meatballs fit the bill perfectly. I was worried they would turn out too hot, but I pleasantly discovered they weren't. Super easy to make, which is also a big plus to any recipe. And it's easy to alter the heat by adding or leaving out the Sriracha.


This recipe was adapted from Life's Ambrosia.


Spicy Turkey Meatballs
  • 1 pound ground turkey
  • 1 egg beaten
  • 1/2 yellow onion, minced
  • 2 green onions, chopped
  • 2 cloves garlic, minced
  • 1/2 teaspoon ground ginger
  • 2 teaspoons sesame seeds
  • 2 tablespoons sriracha
  • 3/4 teaspoon kosher salt
  • 2 tablespoons oil

Preheat oven to 350 degrees.

Combine all ingredients except oil in a bowl. Mix well to combine. Roll into meatballs (I made 21).

Heat oil in a skillet over medium-high heat. Cook meatballs until browned (I found flipping them the hardest part of this as they were very fragile and wanted to fall apart). Transfer to a baking dish.

Bake in the preheated oven for 20 more minutes or until cooked through. Serve immediately.

Sunday, April 29, 2012

3CPB Monkey Bread

YUM! I love monkey bread so I decided a while back to make my own. It's not difficult since you use pre-made dough and yet it's super yummy. First, I ran across a banana monkey bread and thought that sounded wonderful. Then, I ran across a cream cheese filled monkey bread and decided that sounded even better so I was going to make that. Then I had an epiphany! I could combine them! Awesome! 


THEN...I found a caramel pecan cinnamon roll bread and decided to take the topping from THAT and put it on my delightful creation. I have to say that MAN did it turn out beautiful! (I even broke out the GOOD camera to take pictures of this amazingness!) Thus the caramel, cream cheese, pecan, banana monkey bread - or 3CPB for short! 


This turned out really well. I was worried it would end up too sweet with all the sugar and caramel, but it wasn't.


This recipe is adapted (a combination) from Pip and Ebby, Plain Chicken, and Pinch of Yum.


3CPB Monkey Bread

  • 6 Tbsp butter, melted
  • 1/2 cup caramel ice cream topping 
  • 1 cup chopped pecans
  • 2/3 cup dark brown sugar
  • 2/3 cup granulated sugar
  • 1 Tbsp cinnamon
  • Two 12-ounce tubes refrigerated flaky buttermilk biscuits
  • One 8-ounce package cream cheese, cut into 20 cubes
  • 2 large bananas, cut into 20 slices
  • 10 Tbsp butter, melted


Preheat oven to 350 degrees F. Spray a 12-cup bundt pan with cooking spray; set aside (I totally forgot to do this step but luckily it didn't stick to the sides at all with all the caramel and butter in there). In a medium bowl, combine the sugars and cinnamon; set aside. Combine the 6 Tbsp melted butter, caramel and pecans; set aside.


Slice 10 discs of dough from each tube of biscuits. Set discs on a flat surface and set one slice of banana and one cube of cream cheese in the center of each piece of dough. Wrap edges of dough up and around the cheese so all that is visible is the top side of cream cheese cube. 


Dip 10 of the dough-wrapped cheese cubes, cheese-side-up, into the caramel pecan mixture and place in the bottom of prepared pan. Top with half of the sugar mixture and half of the butter (5 Tbsp). Top with the remaining dough-wrapped cheese cubes, cheese-side-down, the remaining sugar and remaining butter.


Bake in the preheated oven for 40 minutes. Invert onto a serving platter and serve. (When I got it out of the oven I thought it looked good, but then I inverted it and wow it was out of this world!)


Bran Muffins

I have always loved bran muffins but the problem is the only boxed mix available that I used to buy started putting raisins directly in the mix instead of in a separate packet as an optional add in. I do not like raisins in my muffins (or anywhere else, really) so to make that mix I had to sift out all the raisins. Too much work. So I looked around and found myself a recipe I thought looked good and wasn't too difficult.


I am glad I went with this one as it turned out excellent. The original recipe gave the option to put in some raisins but I've found out recently that I really like dates, so I decided to put some dates in instead. That was a wonderful idea also - the honey-like taste of the dates blended very well with the bran muffins. I ended up making 12 muffins (as I gave half the batter away) and I seriously wanted to eat all of them they were so good.


This recipe is adapted from the Joy of Baking.com.


Bran Muffins
  • 1 1/2 cups oat bran (the original recipe called for wheat bran, but I couldn't find wheat so I substituted with oat - use whichever you prefer)
  • 1/3 cup boiling water
  • 1/2 cup unsalted butter
  • 1 cup light brown sugar
  • 2 large eggs
  • 2 Tbsp unsulphured molasses
  • 1 tsp pure vanilla extract
  • 1 cup all-purpose flour
  • 1 cup white whole wheat flour (or whole wheat...w.w.w. is what I had available)
  • 2/3 cup old-fashioned rolled oats
  • 1 tsp ground cinnamon
  • 1 Tbsp freshly grated orange zest (about 1 medium-large orange)
  • 1/4 tsp salt
  • 2 tsp baking soda
  • 1 tsp baking powder
  • 3/4 cup milk (I ended up running out of milk and used 1/2 cup milk and 1/8 water and 1/8 cup heavy whipping cream to substitute)
  • 3/4 cup buttermilk
  • 1/2 cup chopped dates (to about the size of a raisin)

Place the oat bran in a bowl and stir in the boiling water (it gets a bit clumpy - don't worry). Set aside.

In the bowl of a stand mixer, or with a hand mixer, beat  the butter with the brown sugar until light and fluffy. Beat in the eggs, one at a time, beating well after each addition. Add the vanilla and molasses and beat until well blended. Add the oat bran and beat until combined.

In a large bowl, whisk together the flours, oats, cinnamon, orange zest, salt, baking soda and powder.   


In a small bowl or measuring cup combine the milk and buttermilk.

Add the flour mixture (in three intervals), alternating with the wet ingredients (in two intervals) to the bran mixture, beginning and ending with the flour mixture. Fold in the chopped dates. Cover and place the batter in the refrigerator until well chilled (several hours or overnight, like I did). 

Preheat oven to 375 degrees F and place the rack in the center of the oven. Line a 12 cup muffin pan with paper liners or else spray with a nonstick vegetable spray.

Fill the muffin cups, using two spoons or an ice cream scoop, about 3/4 full (and if desired, sprinkle muffins with extra oats). Bake about 20 minutes, or until a toothpick inserted into the center of a muffin comes out clean. Remove from oven and place on a wire rack to cool slightly before serving. Serve with butter and honey, if desired.

Friday, April 27, 2012

Banana Nut Baked Oatmeal

Wow...if you love banana nut bread and oatmeal this is the perfect dish for you. Super delicious and wonderfully filling. Plus it is super easy to make. I'm sure you could put in the nut of your preference, so I use pecans because they are my nut of choice.


This recipe is adapted from Budget Bytes.


Banana Nut Baked Oatmeal
  • 1.5 cups (about 3 large) mashed bananas
  • 1/3 cup brown sugar
  • 2 large eggs
  • 1/2 tsp salt
  • 1/2 tsp vanilla extract
  • 1/2 tsp baking powder
  • 1/2 tsp baking soda
  • 1/4 tsp cinnamon
  • 1/8 tsp nutmeg
  • 2 cups milk
  • 2.5 cups old-fashioned oats
  • 1/2 cup chopped pecans

Begin preheating the oven to 350 degrees. Mash the bananas well with a fork (the riper they are the easier to mash). Measure the bananas to make sure you have about 1.5 cups.

Whisk the mashed bananas together with the brown sugar, eggs, salt, vanilla, baking powder, baking soda, cinnamon, and nutmeg. Next whisk in the milk, then stir in the oats. Roughly chop/break the pecans and stir them in as well.

Spray the inside of a glass baking dish (8x8 inch or similar size) with non-stick spray. Pour in the oat mixture. Cover with foil and bake in the preheated oven for 30 minutes. Remove the foil and bake for another 15 minutes or until the center is solid and the edges are slightly golden brown.

Serve warm or refrigerate and enjoy cold! Can eat with maple syrup or milk (or a combination of both is good, too).

Wednesday, April 25, 2012

Cinnamon Roll Cheesecake

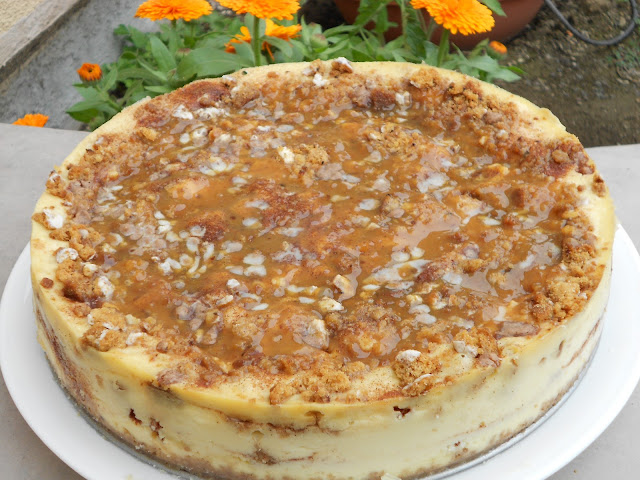
I found this recipe and immediately knew it was the one I HAD to make to have for my birthday. And boy did it not disappoint. Yum city. I love cinnamon and I love caramel - put them in a cheesecake and it's pure bliss. Wasn't super hard to make either, thankfully.


I had a cute little helper who helped me layer the cheesecake - as such, I forgot to drizzle the caramel in the layers as directed so it only made it on the very top. Still worked as it was a minor oversight. It's such a pretty cake too.


This recipe is adapted from Perry's Plate.


Cinnamon Roll Cheesecake
Crust:

  • 1 1/2 c finely crushed Mother's Iced Oatmeal cookies
  • 1/4 c butter, melted
  • 2 T brown sugar

Filling:

  • 3 8-oz packages cream cheese, softened
  • 1 c sugar
  • 1/2 c sour cream or whipping cream
  • 4 eggs
  • 2 tsp vanilla
  • 1/4 c flour
  • 1 c coarsely chopped cookies (same kind as above)
  • 1/2 c cinnamon chips (this is an estimate as I didn't measure this out)
  • 1/4 c butterscotch or caramel sundae topping (I used caramel)
  • 1 tsp cinnamon mixed with 1/4 c sugar

Preheat oven to 325. Place a pan of water on the bottom rack.


For crust, mix cookie crumbs, butter and brown sugar and press into the bottom of an 8-inch springform pan. Spray the sides of the pan with non-stick cooking spray.


For filling, blend cream cheese, sugar and sour cream until smooth, scraping bottom and sides of bowl, about 3-4 minutes. Stir in eggs, vanilla and flour and blend well, 2-3 minutes. (I did this in a stand mixer, but you can easily use a hand mixer).


Spoon 1/3 of filling into pan and dust on some cinnamon sugar mixture. Top with 1/3 of each chopped cookies and cinnamon chips. Drizzle on some caramel topping. Repeat with all layers twice more until everything is used up.


Bake 50-55 minutes or until cheesecake is set about 2 inches from the side and wiggles slightly in the center. Turn oven off, leave door open and let cheesecake cool until you can take it out of the oven without oven mitts. Leave cheesecake on the counter until it's room temperature, then refrigerate overnight.


Serve with whipped cream and caramel topping.


Apple Fritters

To go along with my corn dog and frog eye salad, I made apple fritters for dessert. I figured I might as well make my fried dessert while I've got the oil in the pan ready for frying because of the corn dogs. They turned out really tasty also. Though I did feel the honey sauce for on top was a little on the weak side for my taste so I might want to try something different if I ever made them again. They were a wonderfully fattening dessert to go along with my wonderfully fattening meal (I neglected to mention the chili-cheese fries my dad made as a side dish also).


This recipe is from Gastronomer's Guide.


Apple Fritters
for the apple fritters:
  • 2 Granny Smith apples, peeled, cored, and diced
  • 1 lemon, zested and juiced
  • 2 cups all-purpose flour
  • 1/2 cup granulated sugar
  • 2 teaspoons baking powder
  • 1 teaspoon salt
  • 1 teaspoon ground cinnamon
  • 2 tablespoon butter, melted
  • 3/4 cup whole milk (I used half heavy cream and half 1% milk as I didn't have whole milk)
  • 2 large eggs
  • 1 teaspoon pure vanilla extract
  • canola oil, for frying (I used corn oil because I already had it out from the corn dogs)
for the honey syrup:
  • 1/3 cup honey
  • 1/2 cup water
  • 1 small cinnamon stick
Toss together diced apples with lemon zest and juice in a small bowl to keep from browning.


In a large bowl, combine the dry ingredients: flour, sugar, baking powder, salt, and cinnamon. Mix together with a whisk to aerate.


Combine melted butter, milk, eggs, and vanilla in a small bowl and beat together. Pour the liquid into the dry ingredients and mix until just combined. Fold in diced apples.


Warm 1 to 2 inches of oil in a large pot set over medium-high heat. The temperature of the oil should register around 350 degrees F. Test with a drop of batter.


In the meantime, make the honey syrup. Combine honey, water, and cinnamon stick in a small saucepan. Bring to a boil. Simmer on low until slightly reduced, about 5 to 10 minutes.


To make the fritters, using a 1-1/2-inch releasable scoop, drop dollops of the batter into the hot oil. Using tongs or a fork, turn the fitters so that all sides brown. Fry, in batches, until golden brown all around, about 3 to 5 minutes. Remove to a tray lined with paper towels to drain. Serve drizzled with honey syrup.

Monday, April 23, 2012

Corn Dogs and Frog Eye Salad

I love corn dogs and I love this tiny pasta salad. So I decided to make them for my birthday dinner. They turned out really well, as I had hoped. Home-made corn dogs are delicious. I was so busy cooking and eating that I forgot to take pictures of my corn dogs so I'll update once I've taken a picture of my remaining one.


The corn dog recipe is from Alton Brown.


Corn Dogs
  • 16 turkey dogs
  • 16 wooden chopsticks (or anything to skewer the dogs on)
  • corn oil (enough to fill a pan 1-2 inches deep)
  • 1 cup yellow cornmeal
  • 1 cup all-purpose flour
  • 2 teaspoons kosher salt
  • 1 teaspoon baking powder
  • 1/4 teaspoon baking soda
  • 1/2 teaspoon cayenne pepper
  • 1 tablespoon dried, minced jalapeno pepper
  • 1 (8.5-ounce) can cream-style corn
  • 1/3 cup finely grated onion
  • 1 1/2 cups buttermilk
  • cornstarch, for dredging


Pour oil into a deep fryer or large heavy pot and heat to 375 degrees F. In a medium mixing bowl, combine the cornmeal, flour, salt, baking powder, baking soda, and cayenne pepper. In a separate bowl, combine the jalapeno, corn, onion, and buttermilk. Add the dry ingredients to the wet ingredients all at once, and stir only enough times to bring the batter together; there should be lumps. Set batter aside and allow to rest for 10 minutes.


Place your hot dogs on chopsticks. Scatter the cornstarch onto a plate. Roll each hot dog in the cornstarch and tap well to remove any excess.


Transfer enough batter to almost fill a large drinking glass (refill the glass as needed) and quickly dip in and out of the batter. (I did need to do a little spooning the batter on as it didn't stick quite like I'd wanted it to.) Immediately and carefully place each hot dog into the oil, and cook until coating is golden brown, about 4 to 5 minutes, turning once. With tongs, remove to cooling rack, and allow to drain for 3 to 5 minutes.


This recipe is adapted from Allrecipes.com.


Frog Eye Salad
  • 1 cup white sugar
  • 2 tablespoons all-purpose flour
  • 2 1/2 teaspoons salt
  • 1 3/4 cups unsweetened pineapple juice (you will have more than you need when your pineapple is drained)
  • 2 eggs, beaten
  • 1 tablespoon lemon juice
  • 3 quarts water (to cook the pasta)
  • 1 (16 ounce) package acini di pepe pasta
  • 3 (11 ounce) cans mandarin oranges, drained
  • 2 (20 ounce) cans pineapple tidbits, drained
  • 1 (20 ounce) can crushed pineapple, drained
  • 1 (8 ounce) container frozen whipped topping, thawed
  • 1-2 cups miniature marshmallows


In a sauce pan, combine sugar, flour, 1/2 teaspoon salt, pineapple juice and eggs. Stir and cook over medium heat until thickened (it is like a thick syrup). Remove from heat; add lemon juice and cool to room temperature.


Bring water and remaining salt to a boil and cook pasta until al dente. Rinse under cold water and drain.


In a large bowl, combine the pasta, egg mixture, mandarin oranges, pineapple, whipped topping, and marshmallows. Mix well and refrigerate overnight or until chilled.

Sunday, April 15, 2012

Chili Relleno

I was home alone so it was egg-speriment night for me. I decided after making that quiche to try my hand at making actually chili relleno, and it turned out better than I expected. I did use a bit to much oil and it was a little oily tasting, but otherwise it was quite yummy. We have a sun-dried tomato spread with jalapenos that I decided to put on top and it went really well together.


Chili Relleno
  • 2 pasilla peppers
  • 2 eggs, separated
  • 1/4 cup green pepper, diced
  • 1/4 cup onion, diced
  • 1-2 green onions, sliced
  • 4 veggie sausage links (or any equivalent ground meat of your choice)
  • 1-2 cloves minced garlic
  • salt and pepper to taste
  • olive oil
Place peppers on a small metal tray and broil in a toaster oven on high for 10 minutes per side, or until the skin is blistered and blackened. Place in a bowl covered in saran wrap for 5 minutes (or a sealed bag). Remove the skin carefully and make a slit down one side of the pepper. Carefully de-seed the pepper (you can cut the seeds at the top out and rinse the rest of the seeds out, then pat the pepper dry).


Meanwhile, saute your onions, bell pepper and sausage with garlic until soft. Stuff your peppers with this filling and seal edges with toothpicks.


Beat your egg whites until stiff peaks form. Beat/whip your egg yolks with salt and pepper and gently fold into your whites. Coat your stuffed peppers with the eggs and cook in a pan with oil over medium-high heat until cooked, flipping over to cook all sides (about 3 minutes per side). Serve with tomato sauce or salsa, if desired, and enjoy!

Tuesday, April 10, 2012

Pottage

Yummy, comforting stew. Can't get better than that on a cold day (Not that it was a cold day when I made it this time). The nice thing about pottage is you can put whatever you want in it, really. I usually make mine with beef so I use beef broth, but you could easily use pork or chicken meat and chicken or vegetable broth and it would be an entirely different stew. The original recipe also calls for oats in it, which I'm sure would be really tasty.


Just beware that this recipe calls for a lot of chopping. Takes me at least an hour to chop everything up. I like to chop everything the night before if possible (which is probably why I like making this on Monday...leaves me Sunday night to chop things up).


I am thinking next time I'll season the beef somehow before putting it in the stew. Not sure with what yet, though.


This recipe is adapted from King Arthur Flour. If you want to make this, I recommend going over to the site as they have some useful tips and a very interesting and informative article on the origins of pottage. (I do plan on making the bread that is featured in that article as well, soon - I'll let you know how it turns out.)


Pottage
  • 1 Tbsp oil
  • 2 turnips, diced
  • 2 medium-large rutabagas (the same size as the turnips), diced
  • 1/2 large onion, diced
  • 1 large celery root, diced (if desired - I left it out this time as they can be pricey and the ones at the store currently are pretty small)
  • 1 cup mushrooms, sliced
  • 1 cup leeks, rinsed, diced and washed
  • 1 cup cabbage, diced (I use red cabbage, but either is fine)
  • 1 cup drained, rinsed canned beans or diced fresh green beans (I use green beans)
  • 2 quarts (8 cups) stock (chicken, beef, or vegetable work - I used beef)
  • 1 large or 2 small bay leaves
  • 1/2 tsp ground sage
  • 1/2 tsp dried thyme leaves
  • 1/2 tsp finely chopped fresh rosemary
  • 1 tsp dried or 1 Tbsp fresh parsley
  • 1-2 lbs meat of your choice (I used 2 lbs of beef top sirloin, diced)
  • salt and pepper to taste
  • 1/2-1 cup gluten-free rolled oats, optional (I do not use them)


Place a large kettle over medium heat. Add the oil, onions, rutabagas, and turnips. Cook, covered, for 5 to 10 minutes, stirring occasionally.

Once the harder vegetables start to get a little tender, add the mushrooms, leeks, cabbage, and beans. Cook another 2-5 minutes, then add the stock and herbs.

Bring everything to a simmer and cook for 30 minutes to an hour. (How long I simmer this for depends on how long I have left until I want to serve dinner.)

Season to taste, then add the meat and oats (if using). Cook for at least 20 minutes or as long as you like, replenishing liquid as necessary.

Monday, April 9, 2012

Grilled Rutabaga and Turnip Fries

Ok, so I learned last week how hard it is to cook (grill in particular) with 2 little girls who want to go in and out to the house with you (and I have to go in and out a lot when I grill). I grilled the "fries" in two batches (the second batch I tried sweating them to see if there was a need to get the fries tender inside (there wasn't a need). But unfortunately for my experiment, my inattention made the first batch of fries a tad on the burnt side (still tasty, but a bit more char than I would have preferred...and definitely not very pretty).


They were very soft fries...they definitely didn't get the crispy outside you get by frying, but yummy. It did have a tad more seasoning than they really needed, so I've cut the amount down in my recipe. Feel free to use your own seasonings, if you have something that goes well on fries, though.


This recipe is adapted from Judicial Peach.


Grilled Rutabaga and Turnip Fries
  • 3 turnips, peeled
  • 3-4 rutabagas (depending on the size - try for however many would make an equal number of fries to the turnips)
  • 2 tsp salt
  • 1 tsp black pepper
  • 1 tsp paprika
  • 1/2-1 tsp onion powder
  • 1/2-1 tsp garlic powder
  • 1/2 tsp chili powder
  • olive oil, enough to lightly cover the fries
Preheat your grill on medium heat.

Cut your turnips and rutabagas vertically into halves (or thirds depending on how wide you want your fries). Then cut those pieces into long wedges about 1/2 inch thick. Toss with seasonings and lay on your preheated grill at 45 degree angles (this is where you want wedges as long as possible - I lost a few of the shorter fries to the depths of my grill during turning).

Cook your fries on direct heat for 7-10 minutes per side, watching carefully. Turn over when you see nice grill marks on the bottom (some fries might be turned sooner than others as there are hotter and cooler spots, so make sure to look at more than just one fry to determine whether they need to be turned). When both sides have cooked, check the fries to see if they're tender inside - if they aren't tender, place them on the cool side of the grill and cook on indirect heat until tender. 

Place on a rack to keep them from getting too soggy and serve. We had ours as a side with hamburgers and they worked so well together. (Though another thing I learned was hamburgers get cold faster than it takes to get kids settled with their own dinner...oh well. The fries were still warm at least - the more important part of dinner.)

Tuesday, April 3, 2012

Chili Relleno Cauliflower Quiche

I just want to start off by saying, I tried a week or two ago to make a quiche/souffle type dish just making it up myself and it stunk. It was way too under-seasoned. So, yesterday I had an epiphany! I decided that I could eat chili relleno without cheese, so I decided I could make a quiche out of it! It turned out pretty good, if I do say so. (At least my tummy that's full but still wants more tells me.)


You can take out or add any veggies or meat you want, but make sure to keep the pasilla peppers or it won't be "chili relleno". I was tempted to add a small amount of mushrooms but decided to go easy on adding too much. I might try that next time since I know the recipe works now.


This is my own creation! Not adapted from anywhere! (unless you count the cauliflower crust) Shocking that it was good!


Chili Relleno Cauliflower Quiche

Cauliflower crust
  • 1 cauliflower, florets cut into 1-1 1/2 pieces (they cook faster when smaller)
  • 3 eggs
  • 2-3 tsp minced garlic
  • 2 tsp salt
  • 1 tsp black pepper
  • 2 cups cheese (optional)

Filling
  • 5-6 eggs (I used 5 this time)
  • 1 spoonful cottage cheese (about 2 Tbsp) (you can use cream/milk or leave it out altogether if you want to - I wanted to try it out and see if it would work, though I have no idea if it really did anything for the recipe)
  • Salt & pepper
  • 1/2 tsp onion powder
  • 1/2 tsp paprika
  • 1/2 tsp cayenne
  • 3 pasilla peppers
  • 1 leek, sliced
  • Ground beef - seasoned with a dash of cumin, paprika, and ancho chili powder to taste
  • ½-1 cup cheese (optional)

Turn on grill. Preheat oven to 450 degrees F. Prepare a pie, tart or baking pan with parchment paper or nonstick spray (or both).

Boil or steam the cauliflower until it is easily stabbed with a fork, about 8-10 minutes.

While the cauliflower is cooking, grill your peppers until blistered and blackened all over. [Alternatively, you could roast your peppers in other ways.] Take off the grill and let sit in a bowl covered with saran wrap for 15 minutes. Then peel and de-seed them, tearing/cutting them into small strips for later. 

(While your cauliflower and peppers are cooking, you could spend your time cooking your beef instead of doing it in advance.)

While your peppers are steaming, drain your cauliflower well, transfer to a food processor, and process until smooth. Transfer cauliflower puree to a large bowl and add the garlic, salt, and pepper (and cheese, if using). Mix well. Taste and adjust seasonings, if needed. Add eggs and mix in.

Spread your cauliflower mixture in an even layer and slightly up the sides of the prepared pan. Bake it for about 18-20 minutes or until the crust begins to turn a darker golden brown around the edges.

When the crust is almost done baking place your leeks in a pan with a small amount of water or oil and cook over a medium heat until tender but not browned, about 5 minutes. Set aside.

When the crust is finished baking, lower your oven’s temperature to 350 degrees F. Then, in a clean bowl, whisk your eggs and cottage cheese. Add your salt, pepper, onion powder, paprika, and cayenne to your eggs and mix in (you may add cheese to this, if desired).

Into the crust, place your grilled pepper strips, ground beef, and leeks. Cover everything with your eggs. Place in the oven and bake for 35-45 minutes until eggs are set. (I ended up needing 40 minutes)

Let cool slightly and serve with salsa or tomato sauce, if desired. (I preferred the tomato sauce, but that could be because I don't really care for the salsa we have currently.) I can't wait to try this out with cheese.


Swiss Chard and Meatball Soup

I LOVE this soup. I've made it several times and each time it comes out just a tiny bit different - sometimes the meatballs are mild and sometimes they pack some kick. Either way, it's so comforting and yummy. 


The original recipe uses white beans, but I find it's great without them. It's also pretty simple to make.


This recipe was adapted from Kitchen Culinaire. Feel free to try theirs if you want the white beans.


Swiss Chard and Meatball Soup

    Meatballs:
    • 1 pound ground turkey (ground pork also works as well, if you prefer)
    • 1/4 teaspoon red chilli flakes
    • 1/4 teaspoon coarse sea salt
    • dash of cayenne and ancho chili powder (use more or less depending on how spicy you like it)
    • 2 tablespoons minced yellow onion (I probably use more, but be careful not to use too much our your meatballs will be harder to form)
    • 1 tablespoon chopped parsley
      Soup:
      • 1 tablespoon olive oil
      • 1 medium leek, sliced and cleaned well of any grit or dirt
      • 2 cloves of garlic, minced
      • 1 bunch of swiss chard, tough stems removed and sliced into thin ribbons (about 6 cups)
      • 6 cups (1 49.5 oz can) chicken stock/broth
      • Salt and freshly ground pepper

      To make the meatballs place the turkey meat in a medium bowl and add the minced onion, and parsley.  Add the spices to the ground meat, onion and parsley. Season with some more salt and pepper, if desired and mix gently. Form into meatballs (I scoop out portions with a very full Tablespoon then roll with my hands gently to keep them together). Set aside.


      In a medium soup pot heat the olive oil and add the sliced leeks. Sauté leeks over low heat until soft and fragrant but take care not to allow the leeks to brown. Once the leeks are cooked down, add the minced garlic and sauté for a minute or so before adding the sliced swiss chard. Cook the mixture until the chard is wilted, about 2 to 3 minutes. 


      Add the chicken stock, salt, and pepper to taste and bring to a simmer. Add the meatballs (With the pot I use, most of the meatballs poke above the liquid a tiny bit, so I usually put them all in, turn them all over immediately, cover the pot, and cook in the simmering soup for 13 minutes or until the meatballs are cooked through. Check and adjust seasonings. Serve hot!

      Monday, April 2, 2012

      Pasilla Pepper and Onion Carnitas

      Just fyi.....poblano = pasilla. Not very spicy peppers, but very tasty.


      And ok, so it was not my night to cook but I chose this recipe so I'm posting about it anyways. (^_^) We had the missionaries over for dinner and they LOVED it. They each had 2 huge tortillas full of the stuff. No leftovers for me that night. It was only marginally harder than just throwing dinner into a crock-pot.


      I did try making some cauliflower tortillas (which is basically the cauliflower crust baked in small circles for 12 minutes, flip them and 5 minutes more). They didn't work out at all without the cheese, though I'm told the cheese ones I made for the others worked well with dinner. It just seemed like a lot of work for very little gain. I don't think I'll be making those again. Keeping them in one piece was difficult.


      This recipe was taken from In Sock Monkey Slippers.

      Pasilla Pepper and Onion Carnitas
      • 2 1/2 to 3 pound pork loin center cut roast
      • a blend of Kosher salt, black and red pepper, garlic powder, paprika (If you have Montreal Seasoning, use it here. We don't have it, so we rubbed a mix of these spices on the pork - use your judgement on amounts.)
      • 1 tsp chili powder
      • 2 tsp extra virgin olive oil
      • 3 poblano peppers
      • 1 yellow onion
      • 2 garlic cloves, minced
      • 1/4 cup low-sodium chicken stock or broth

      Cover all sides of the pork loin with the Montreal seasoning mixture and chili powder.


      In a large skillet, heat oil over medium heat and place the pork loin in the pan. Sear the meat for 3 to 5 minutes until browned. Repeat with all sides until the entire roast is seared. (This was cooked extra long to make sure it got nice and browned with all those lovely flavors.)

      Place in a slow cooker, fat side up.


      Cut the poblanos and onions in half rings and place in the same skillet as the meat was seared in. Add the garlic. Stir and saute  for 5 minutes until barely cooked but picks up any remaining flavor that the pork loin had previously left.


      Place the peppers and onions on top of the roast in the slow cooker and add the chicken stock or broth. Cover and cook on low for 8 hours or high for 4 hours.


      Once finished, remove the pork loin and shred with a fork. You can serve on a warm toasted tortilla and top with the poblanos and onions and whatever else you choose. 

      Sunday, April 1, 2012

      Beef Sirloin Kebabs

      I love these kebabs. I've made them several times so of course the first time I make them after starting this blog, I mess them up. The recipe calls for sweet (red ) bell peppers - so of course the 2 that I had in the drawer were bad and I couldn't use them. I didn't have time to run to the store to pick up more so I improvised with the green bell peppers I had (which were going to be cut into chunks to put on my skewers). Because the green are much more bitter, my dad suggested using tomatoes in it as well. This worked as a viable alternative if necessary, but I prefer the original.


      Then of course, to make things worse, I overcooked my kebabs. Didn't get to the point of inedible, thankfully, but they were a bit charred and chewy. Sigh. We even have really good meat that we buy for these kebabs...getting good meat is very important when doing kebabs.


      This recipe is out of Weber's Time to Grill. I highly recommend getting this book if you like to grill. All the recipes I've tried in it so far have been delicious. (Like the chicken that I put on my Cauliflower Pizza.)


      Beef Sirloin Kebabs

      • 2 medium sweet bell peppers (red, yellow, or orange)
      • 6 garlic cloves, minced
      • 2 Tbsp red wine vinegar
      • 2 tsp ground cumin
      • 1 tsp paprika
      • 1 tsp kosher salt
      • 1/2 tsp black pepper
      • 1/2 cup extra-virgin olive oil
      • 2 lbs top sirloin, cut into 1" cubes
      • 1 large bell pepper (I use green), chopped into 1" squares
      • 1 red onion, chopped into 1" squares


      Turn your grill on high heat and place your sweet bell peppers on their sides, cooking until they are blackened all over (the more black the better for peeling the skins off later) - about 10-15 minutes. Remove from the grill and place in a bowl and cover with saran wrap for at least 15 minutes to steam. (Since it is a while before you use the grill again, I turn my grill off.)

      While the peppers are steaming, place your seasonings and olive oil into a food processor. When the peppers are done, peel and de-seed them and place them into the processor and pulse until the peppers are chopped and it becomes like a thick paste.

      Pour about 1/3-1/2 the mixture onto your sirloin cubes and make sure they are coated well. Then place your ingredients onto your skewers alternating with the sirloin, bell pepper, and onion squares. (The recipe says to let your kebabs sit for 15-30 minutes, but I never do that.)

      Turn your grill on high and place your skewers onto it. (If you left your grill on, I would lower the heat immediately to a medium heat.) I usually cook them on one side for about 7-8 minutes, then turn them over and lower the heat to a medium to medium-low heat for another 7-8 minutes or so. (Just watch your kebabs carefully and take them off when they are cooked to your liking.)

      Serve immediately, topping with your extra sauce, if desired.

      [Next time I make this, I'll take better pictures, promise. And hopefully they won't be overcooked either.]